Copyright © 1998-2006 Bela Ban
Copyright © 2006-2011 Red Hat Inc
This document is licensed under the Creative Commons Attribution-ShareAlike (CC-BY-SA) 3.0
2009
This is a short tutorial on how to install JGroups and write a simple application. The goal is to show how to configure JGroups and how to write a simple application showing the major methods of the API.
Bela Ban, Kreuzlingen Switzerland August 2007
JGroups can be downloaded here. For this tutorial, I'm using the binary version of JGroups 2.5, so the ZIP file to download is JGroups-2.5.0.bin.zip. Note that JGroups 2.5 requires JDK 1.5 or higher.
Unzip JGroups-2.5.0.bin.zip into a directory JGroups-2.5.0.bin. The contents of the directory are
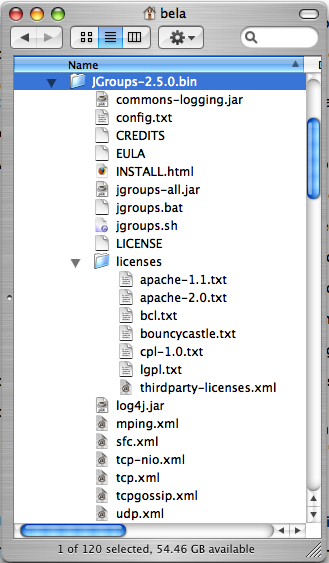
The most important files are:
- jgroups.bat and jgroups.sh: scripts to run a JGroups application (including the correct JARs and XML files)
- INSTALL.html: detailed configuration instructions plus trouble shooting
- jgroups-all.jar (required): JGroups functionality, including demo and junit apps. If a smaller JAR is required, this can be done by downloading the source distribution and invoking the "jar" target, which creates a jgroups-core.jar file (ca 1MB).
- log4j.jar (optional): commons-logging can also use JDK logging
-
Various XML file: different JGroups configurations, e.g.
- mping.xml: TCP based stack with dynamic discovery
- sfc.xml: UDP (using IP multicasting) based stack with simple flow control
- tcp-nio.xml: TCP based stack with fixed configuration (list of nodes) using NIO (thread pool for all TCP connections)
- tcp-nio.xml: TCP based stack with fixed configuration (list of nodes) using plain TCP (1 thread / TCP connection)
- tcpgossip.xml: tunnel based configuration which routes messages to a remote GossipRouter, used to tunnel firewalls
- udp.xml: default IP multicast based configuration
- config.txt: configuration file for performance tests
Add jgroups-all.jar to your CLASSPATH. If you use the log4j logging system, you also have to add log4j.jar (this is not necessary if you use the JDK logging system).
As an alternative, you can also use jgroups.bat. Note that jgroups.sh requires work, as it uses backslashes (developed under Cygwin/Windows), so it is currently not usable under UNIX as is.
To see whether your system can find the JGroups classes, execute the following command:
java org.jgroups.Version
or
java -jar jgroups-all.jar
You should see the following output (more or less) if the class is found:
            $ java -jar jgroups-all.jar

            Version:        2.5.0
            CVS:            $Id: installation.xml,v 1.4 2009/05/13 13:22:09 belaban Exp $
            History:        (see doc/history.txt for details)
To test whether JGroups works okay on your machine, run the following command twice:
java org.jgroups.demos.Draw
2 whiteboard windows should appear as shown in Figure 1.2, “Screenshot of 2 Draw instances”.
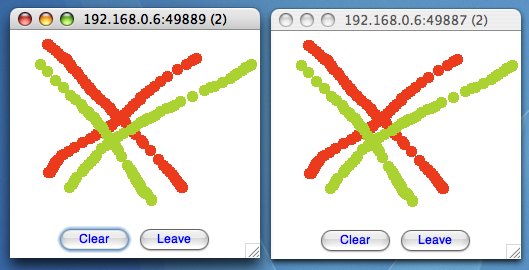
If you started them simultaneously, they could initially show a membership of 1 in their title bars. After some time, both windows should show 2. This means that the two instances found each other and formed a group.
When drawing in one window, the second instance should also be updated. As the default group transport uses IP multicast, make sure that - if you want start the 2 instances in different subnets - IP multicast is enabled. If this is not the case, the 2 instances won't 'find' each other and the sample won't work.
If the 2 instances find each other and form a cluster, you can skip ahead to the next chapter ("Writing a simple application").
(You may skip this section if the 2 instances found each other correctly in the previous section).
Sometimes there isn't a network connection (e.g. DSL modem is down), or we want to multicast only on the local machine. To do this, we can use the loopback device (127.0.0.1):
java -Djgroups.bind_addr=127.0.0.1 org.jgroups.demos.Draw
You should again see 2 instances of Draw which form a cluster. If this is not the case, you may have to add a multicast route to the loopback device (this requires superuser or admin privileges):
route add -net 224.0.0.0 netmask 240.0.0.0 dev lo
This means that all traffic directed to the 224.0.0.0 network will be sent to the loopback interface, which means it doesn't need any network to be running.
Typical home networks have a gateway/firewall with 2 NICs: the first (eth0) is connected to the outside world (Internet Service Provider), the second (eth1) to the internal network, with the gateway firewalling/masquerading traffic between the internal and external networks. If no route for multicast traffic is added, the default will be to use the fdefault gateway, which will typically direct the multicast traffic towards the ISP. To prevent this (e.g. ISP drops multicast traffic, or latency is too high), we recommend to add a route for multicast traffic which goes to the internal network (e.g. eth1).
If the 2 Draw instances don't find each other, read INSTALL.html, which comes with JGroups and has more detailed trouble shooting information. In a nutshell, there are multiple possible reasons the cluster doesn't form:
- A firewall discards packets. To verify this, turn the firewall off. If the cluster forms, then turn the firewall back on and selectively add rules to let JGroups traffic pass.
- Use of IPv6. JGroups does work with IPv6, but some JDK implementations still have issues with it, so you can turn IPv6 off by passing the "-Djava.net.preferIPv4Stack=true" system property to the JVM.
-
You don't use the right network interface (NIC): define the NIC with the jgroups.bind_addr system
property:
java -Djgroups.bind_addr=192.168.5.2 java.org.jgroups.demos.Draw - There is no multicast route for the chosen NIC.
The goal of this chapter is to write a simple text-based chat application (SimpleChat), with the following features:
- All instances of SimpleChat find each other and form a cluster.
- There is no need to run a central chat server to which instances have to connect. Therefore, there is no single point of failure.
- A message is sent to all instances of the cluster.
- An instance gets a notification callback when another instance leaves (or crashes) and when other instances join.
- (Optional) We maintain a common cluster-wide shared state, e.g. the chat history. New instances acquire that history from existing instances.
JGroups uses a JChannel as the main API to connect to a cluster, send and receive messages, and to register listeners that are called when things (such as member joins) happen.
What is sent around are Messages, which contain a byte buffer (the payload), plus the sender's and receiver's address. Addresses are subclasses of org.jgroups.Address, and usually contain an IP address plus a port.
The list of instances in a cluster is called a view (org.jgroups.View), and every instance contains exactly the same View. The list of the addresses of all instances can get retrieved by calling View.getMembers().
Instances can only send or receive messages when they've joined a cluster.
When an instance wants to leave the cluster, methods JChannel.disconnect() or JChannel.close() can be called. The latter actually calls disconnect() if the channel is still connected before closing the channel.
To join a cluster, we'll use a JChannel. An instance of JChannel is created with a configuration (e.g. an XML file) which defines the properties of the channel. To actually connect to the cluster, the connect(String name) method is used. All channel instances which call connect() with the same argument will join the same cluster. So, let's actually create a JChannel and connect to a cluster called "ChatCluster":
import org.jgroups.JChannel;

public class SimpleChat {
    JChannel channel;
    String user_name=System.getProperty("user.name", "n/a");

    private void start() throws Exception {
        channel=new JChannel();
        channel.connect("ChatCluster");
    }

    public static void main(String[] args) throws Exception {
        new SimpleChat().start();
    }
}
First we create a channel using the empty contructor. This configures the channel with the default properties. Alternatively, we could pass an XML file to configure the channel, e.g. new JChannel("/home/bela/udp.xml").
The connect() method joins cluster "ChatCluster". Note that we don't need to explicitly create a cluster beforehand; connect() creates the cluster if it is the first instance. All instances which join the same cluster will be in the same cluster (of course!), for example if we have
- ch1 joining "cluster-one"
- ch2 joining "cluster-two"
- ch3 joining "cluster-two"
- ch4 joining "cluster-one"
- ch5 joining "cluster-three"
, then we will have 3 clusters: "cluster-one" with instances ch1 and ch4, "cluster-two" with ch2 and ch3, and "cluster-three" with only ch5.
We now run an event loop, which reads input from stdin ('a message') and sends it to all instances currently in the cluster. When "exit" or "quit" quit are entered, we fall out of the loop and close the channel.
    private void start() throws Exception {
        channel=new JChannel();
        channel.connect("ChatCluster");
        eventLoop();
        channel.close();
    }

    private void eventLoop() {
        BufferedReader in=new BufferedReader(new InputStreamReader(System.in));
        while(true) {
            try {
                System.out.print("> "); System.out.flush();
                String line=in.readLine().toLowerCase();
                if(line.startsWith("quit") || line.startsWith("exit")) {
                    break;
                }
                line="[" + user_name + "] " + line;
                Message msg=new Message(null, null, line);
                channel.send(msg);
            }
            catch(Exception e) {
            }
        }
    }
We added the call to eventLoop() and the closing of the channel to the start() method, and we provided an implementation of eventLoop.
The event loop blocks until a new line is ready (from standard input), then sends a message to the cluster. This is done by creating a new Message and calling Channel.send() with it as argument.
The first argument of the Message constructor is the destination address. A null destination address means send the message to everyone in the cluster (a non-null address of an instance would send a message from us to only 1 instance).
The second argument is our own address. This is null as well, as the stack will insert the correct address anyway.
The third argument is the line that we read from stdin, this uses Java serialization to create a byte[] buffer and set the message's payload to it. Note that we could also serialize the object ourselves (which is actually the recommended way !) and use the Message contructor which takes a byte[] buffer as third argument.
The application is now fully functional, except that we don't yet receive messages or view notifications. This is done in the next section below.
Let's now register as a Receiver to receive message and view changes. To this end, we could implement org.jgroups.Receiver (with 6 methods), however, I chose to extend ReceiverAdapter which has default implementations, and only override callbacks (receive() and viewChange()) we're interested in. We now need to extend ReceiverAdapter:
public class SimpleChat extends ReceiverAdapter {
, set the receiver in start():
    private void start() throws Exception {
        channel=new JChannel();
        channel.setReceiver(this);
        channel.connect("ChatCluster");
        eventLoop();
        channel.close();
    }
, and implement receive() and viewAccepted():
   public void viewAccepted(View new_view) {
        System.out.println("** view: " + new_view);
    }

    public void receive(Message msg) {
        System.out.println(msg.getSrc() + ": " + msg.getObject());
    }
The viewAccepted() callback is called whenever a new instance joins the cluster, or an existing instance leaves (crashes included). Its toString() method prints out the view ID (an increasing ID) and a list of the current instances in the cluster
In receive(), we get a Message as argument. We simply get its buffer as an object (again using Java serialization) and print it to stdout. We also print the sender's address (Message.getSrc()).
Note that we could also get the byte[] buffer (the payload) by calling Message.getBuffer() and then de-serializing it ourselves, e.g. String line=new String(msg.getBuffer()).
Now that the demo chat application is fully functional, let's try it out. Start an instances of SimpleChat:
                [mac] /Users/bela$ java SimpleChat
                -------------------------------------------------------
                GMS: address is 192.168.0.6:49963
                -------------------------------------------------------
                ** view: [192.168.0.6:49963|0] [192.168.0.6:49963]
                >
The address of this instance is 192.168.0.6:49963 (IP address:port). It is the only instance so far. So let's start the second instance and type something:
                [mac] /Users/bela$ java SimpleChat
                -------------------------------------------------------
                GMS: address is 192.168.0.6:49964
                -------------------------------------------------------
                ** view: [192.168.0.6:49963|1] [192.168.0.6:49963, 192.168.0.6:49964]
                >
The cluster list is now [192.168.0.6:49963, 192.168.0.6:49964], showing the first and second instance that joined the cluster. Note that the first instance (192.168.0.6:49963) also received the same view, so both instances have the exact same view with the same ordering of its instances in the list. The instances are listed in order of joining the cluster, with the oldest instance as first element.
Sending messages is now as simple as typing a message after the prompt and pressing return. The message will be sent to the cluster and therefore it will be received by both instances, including the sender.
If the word "exit" or "quit" is entered, then the instance will leave the cluster gracefully. This means, a new view will be installed immediately.
To simulate a crash, simply kill an instance (e.g. via CTRL-C, or from the process manager). The other surviving instance will receive a new view, with only 1 instance (itself) and excluding the crashed instance.
One of the uses of JGroups is for maintaining state that is replicated across a cluster. For example, state could be all the HTTP sessions in a web server. If those sessions are replicated across a cluster, then clients can access any server in the cluster after a server which hosted the client's session crashed, and the user sessions will still be available.
Any update to a session is replicated across the cluster, e.g. by serializing the attribute that was modified and sending the modification to every server in the cluster via JChannel.send(). This is needed so that all servers have the same state.
However, what happens when a new server is started ? That server has to somehow get the existing state (e.g. all HTTP sessions) from an existing server in the cluster. This is called state transfer.
State transfer in JGroups is done by implementing 2 (getState() and setState()) callbacks and calling the JChannel.getState() method. method. Note that, in order to be able to use state transfer in an application, the protocol stack has to have a state transfer protocol (the default stack used by the demo app does).
The start() method is now modified to include the call to JChannel.getState():
    private void start() throws Exception {
        channel=new JChannel();
        channel.setReceiver(this);
        channel.connect("ChatCluster");
        channel.getState(null, 10000);
        eventLoop();
        channel.close();
    }
The getState() method actually returns a boolean, which is false for the first instance in a cluster, and should be true for subsequent instances.
The Receiver interface defines a callback getState() which is called on an existing instance to fetch the cluster state. In our demo application, we define the state to be the chat conversation. This is a simple list, to the tail of which we add every message we receive. (Note that this is probably not the best example for state, as this state always grows. As a workaround, we could have a bounded list, which is not done here though).
The list is defined as an instance variable:
final List<String> state=new LinkedList<String>();
The getState() callback implementation is
    public byte[] getState() {
        synchronized(state) {
            try {
                return Util.objectToByteBuffer(state);
            }
            catch(Exception e) {
                e.printStackTrace();
                return null;
            }
        }
    }
The getState() method is called in the state provider, ie. an existing instance, to return the shared cluster state.
Since access to state may be concurrent, we synchronize it. Then we call Util.objectToByteBuffer() which is a JGroups utility method using simple serialization to generate a byte buffer from an object.
The setState() method is called on the state requester, ie. the instance which called JChannel.getState(). Its task is to deserialize the byte buffer and set its state accordingly:
    public void setState(byte[] new_state) {
        try {
            List<String> list=(List<String>)Util.objectFromByteBuffer(new_state);
            synchronized(state) {
                state.clear();
                state.addAll(list);
            }
            System.out.println("received state (" + list.size() + " messages in chat history):");
            for(String str: list) {
                System.out.println(str);
            }
        }
        catch(Exception e) {
            e.printStackTrace();
        }
    }
We again call a JGroups utility method (Util.objectFromByteBuffer()) to create an object from a byte buffer (using Java serialization).
Then we synchronize on state, and set its contents from the received state.
We also print the number of messages in the received chat history to stdout. Note that this is not feasible with a large chat history, but - again - we could have a bounded chat history list.
In this tutorial, we showed how to create a channel, join and leave a cluster, send and receive messages, get notified of view changes and implement state transfer. This is the core functionality provided by JGroups through the JChannel and Receiver APIs.
JGroups has two more areas that weren't covered: building blocks and the protocol stack.
Building blocks are classes residing on top of a JChannel and provide a higher abstraction level, e.g. request-response correlators, cluster-wide method calls, replicated hashmaps and so forth.
The protocol stack allows for complete customization of JGroups: protocols can be configured, removed, replaced, enhanced, or new protocols can be written and added to the stack.
We'll cover the protocol stack and available protocols in a later article.
The code for SimpleChat can be found here.
Here are some links for further information about JGroups:
- SimpleChat code: SimpleChat.java
- JGroups web site: http://www.jgroups.org
- Downloads: here
- JIRA bug tracking: http://jira.jboss.com/jira/browse/JGRP
- Mailing lists: http://sourceforge.net/mail/?group_id=6081
[Ensemble:1997] The Ensemble Distributed Communication System , CS Dept Cornell University , 1997 . http://www.cs.cornell.edu/Info/Projects/Ensemble/index.html .